If you’re like me, your car’s seats have seen better days. The upholstery is probably ripped or stained, and the foam padding is probably flattened from years of use. But there’s no need to buy new seats! You can cover your existing seats with a saddle blanket seat cover. Saddle blanket seat covers are easy to make, and they’ll give your car a whole new look. Here’s how to do it:
First, measure the width and length of your car’s seat. Then, cut a piece of saddle blanket that is slightly larger than the seat. Fold the top edge of the saddle blanket over the back of the seat, and staple it in place. Next, fold the bottom edge of the saddle blanket under the front of the seat, and staple it in place. Finally, tuck the sides of the saddle blanket under the seat, and staple them in place. That’s it! Your new Saddle Blanket Seat Cover is ready to use.
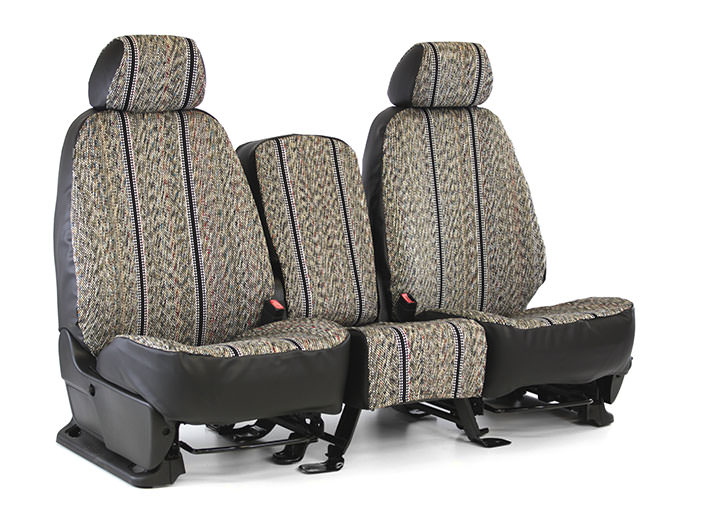
SADDLE BLANKET TRUCK BENCH SEAT COVER FOR MY FORD F100!
- Gather your materials
- You will need a saddle blanket, scissors, and a sewing machine
- Cut the saddle blanket in half
- Sew the two halves together along the long side
- Fold the resulting rectangle in half lengthwise and sew the two short sides together, leaving an opening for your headrest
- Slip the cover over your seat and secure it with Velcro strips or ties
Diy Mexican Blanket Seat Covers
Diy Mexican blanket seat covers are a great way to add some flair to your car’s interior. They’re easy to make and can be customized to match your car’s exterior paint job. Here’s how you can make your own Mexican blanket seat covers:
1. Cut two pieces of fabric that are the same size as your car’s front seats. If you’re not sure what size to cut, take a seat cover off of one of the front seats and use it as a template.
2. Sew the two pieces of fabric together along the edges, leaving about an inch seam allowance.
3. Hem the edges of the seat cover by folding over the fabric and sewing it down. This will give the seat cover a nice, finished look.
4. Install the seat cover by slipping it over the back of the front seat and tucking it in around the sides and bottom. That’s it!
Credit: www.shearcomfort.com
What are Saddle Blanket Seat Covers Made Of?
Saddle blanket seat covers are made from a variety of materials, including wool, cotton, polyester, and nylon. The most popular material for saddle blanket seat covers is wool, as it is durable and provides good insulation. Cotton is also a popular choice for saddle blanket seat covers, as it is soft and comfortable. Polyester and nylon are less common choices for saddle blanket seat covers, but they can be found in some stores.
How Do You Tie a Saddle Seat Cover on a Blanket?
Assuming you would like a blog post discussing how to tie a saddle seat cover on a blanket: “How to Tie a Saddle Seat Cover on a Blanket” Whether you are protecting your horse’s saddle from the elements or simply adding some extra warmth on a cold day, using a saddle seat cover is a great way to do so. But how exactly do you go about tying one on? Here is a step-by-step guide:
1. Start by folding the blanket in half lengthwise. Then, take the corner of the folded edge and fold it over so that it forms a triangle.
2. Next, take the two top corners of the triangle and tie them together with a piece of string or twine. Make sure that the knot is tight and secure.
3. Now, take the bottom corner of the triangle and fold it up towards the top, creating another smaller triangle. Once again, take the two top corners and tie them together tightly.
4. At this point, you should have something that resembles an envelope – with two tied corners at the top and one open corner at the bottom. To close up this opening, simply fold over the flap and tie it closed with another piece of string or twine. And that’s it! Your saddle seat cover is now ready to use.

Can I Use a Blanket As a Seat Cover?
If you’re looking for a quick and easy way to add some extra warmth to your car during colder months, you might be wondering if you can just use a blanket as a seat cover. Unfortunately, this isn’t really a great idea for several reasons. First of all, blankets are not typically made from materials that are very durable or resistant to wear and tear.
This means that they’re likely to rip or tear easily if you try to use them as seat covers. Additionally, blankets tend to be quite bulky and difficult to maneuver when trying to put them on or take them off of your seats. Finally, blankets will also move around a lot while you’re driving, which can be extremely dangerous.
If you need to brake suddenly or make any sudden movements, the blanket could slip off of the seat and cause you problems. So what’s the bottom line? Can you use a blanket as a seat cover? No, it’s not really a good idea. If you want to add some extra warmth to your car during colder months, invest in some seat covers that are specifically designed for this purpose.

Are Saddle Blanket Seat Covers Waterproof?
Saddle blanket seat covers are not inherently waterproof, as they are primarily designed to provide a comfortable and decorative layer for your car seats. However, there are options available that are treated with waterproof coatings or have additional layers to provide some level of water resistance. It’s important to check the product specifications or ask the manufacturer to ensure you are getting the level of protection you need.
If water resistance is a priority for you, be sure to look for seat covers specifically marketed as waterproof or water-resistant. Additionally, using a waterproofing spray or treatment on your saddle blanket seat covers can add an extra layer of protection against spills or moisture. Keep in mind that even with water-resistant features, it’s still important to clean up spills and keep your seat covers dry to prevent damage to your car seats.

Frequently Asked Questions [FAQs]
How can I make custom saddle blanket seat covers for my vehicle?
To make custom saddle blanket seat covers for your vehicle, you can either purchase a custom-fit set from a reputable manufacturer or weave your own using a suitable fabric and following the specifications for your vehicle’s seats.
What are the key features of custom saddle blanket seat covers?
Custom saddle blanket seat covers are made to order, ensuring a perfect fit for your vehicle’s seats. They often come with additional features such as map pockets, console lid covers, and a warranty for durability.
Are custom saddle blanket seat covers easy to install?
Yes, most custom saddle blanket seat covers are designed for easy installation and come with instructions to guide you through the process.
How durable are saddle blanket seat covers?
Saddle blanket seat covers are known for their heavy-duty construction, featuring woven strands, and are often backed with foam for added durability. Many come with a warranty, providing assurance of their long-lasting quality.
What is the warranty coverage for custom saddle blanket seat covers?
The warranty for custom saddle blanket seat covers may vary depending on the manufacturer, but it typically covers against defects in materials and workmanship for a specified period, often ranging from one to three years.
Can custom saddle blanket seat covers protect my vehicle’s seats?
Yes, custom saddle blanket seat covers are specifically designed to protect your vehicle’s seats from wear and tear, spills, and fading, helping to preserve the original upholstery.
Conclusion
Making your own saddle blanket seat covers is a great way to personalize your car or truck. You can find plenty of tutorials online, but we’ve got you covered with step-by-step instructions. First, gather your materials. You’ll need a few yards of fabric (we recommend a cotton blend), scissors, and an old towel or two. Then, cut the fabric into three rectangles – one for the back and two for the sides.
Next, fold over the top edge of each piece about an inch and a half and sew it down. Now it’s time to attach the pieces together. Place the back piece on top of the two side pieces, right sides facing up. Sew them together along the sides and bottom, leaving the top edge open. Finally, turn everything right side out and tuck in any loose edges. That’s it!