As a key figure in the wedding celebration, the mother of the bride deserves a manicure that reflects her grace and style. Nail art designs for the mother of the bride offer a unique opportunity to enhance the overall elegance of her look. From subtle and sophisticated patterns to intricate details that complement the wedding theme, these designs add a special touch to her hands as she celebrates this significant moment. Whether opting for classic and refined motifs or incorporating elements that match the wedding color palette, these nail art ideas aim to elevate the mother of the bride’s ensemble. This guide will explore various designs and techniques, inspiring you to create beautiful and memorable nail art that perfectly complements the joyous occasion.
We’ve put together some stunning nail art designs for Mother of the Bride, perfect for any style or budget. From simple and elegant designs to more elaborate and eye-catching ones, there’s sure to be something here that your mum will love. If you’re looking for something classic, why not try a french manicure?
This timeless look can be dressed up or down, depending on your mum’s outfit. For a more glamorous take on the French manicure, try adding some sparkle with rhinestones or glitter accent nails. For something a little different, opt for a nude base with bold statement nails.
This is a great way to let your mum’s personality shine through while still keeping her nails looking chic and sophisticated. Alternatively, go for an all-over print or patterned design. Florals are always popular choices for weddings, but geometric patterns can also look stunning – especially if they match your wedding theme.
039 – Mother of the Bride
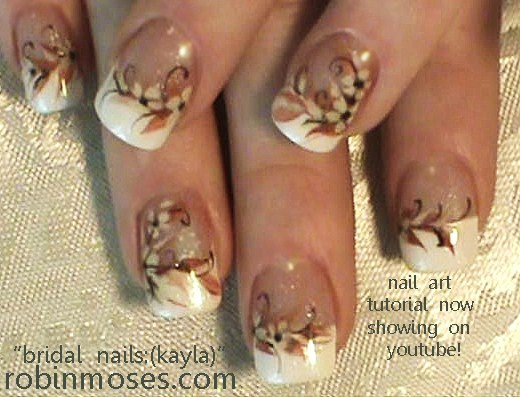
Best Nails for Mother of Bride
Choosing the best nails for the mother of the bride is a thoughtful way to enhance her overall look and contribute to the special atmosphere of the wedding. The mother of the bride plays a significant role in the celebration, and attention to detail, including nail art, adds a touch of elegance to her ensemble. Here are some ideas for the best nails that will complement her style and the wedding theme:
1. Classic French Manicure: Timeless and sophisticated, the classic French manicure is an excellent choice for the mother of the bride. The combination of a pale pink or nude base with a clean white tip offers a polished and refined look that matches various dress styles and color schemes.
2. Subtle Nail Art Accents: Incorporating subtle nail art accents can add a personalized touch without being overly flashy. Delicate floral patterns, lace designs, or a simple sparkle on one or two nails can enhance the overall aesthetic without overshadowing the mother of the bride’s ensemble.
3. Elegant Neutral Shades: Opting for elegant neutral shades, such as soft blush, champagne, or taupe, can create a sophisticated and understated look. These colors complement a range of outfits while exuding a timeless and graceful charm.
4. Match with Wedding Colors: Coordinating the nail color with the wedding’s color palette is a thoughtful way to tie the mother of the bride’s look into the overall theme. Whether it’s a subtle accent or a more pronounced match, this approach adds a cohesive and harmonious element to her appearance.
5. Jewel-Toned Elegance: For evening weddings or events with a more glamorous theme, jewel-toned nail colors like deep burgundy, emerald green, or navy blue can add a touch of opulence to the mother of the bride’s nails. These rich hues convey sophistication and pair well with formal attire.
6. Modern Metallics: Embrace a contemporary vibe by choosing metallic nail colors like gold, silver, or rose gold. These shades bring a modern and chic element to the overall look while remaining tasteful and sophisticated.
7. Timeless Red Nails: Red nails are a classic choice that exudes confidence and style. Whether opting for a traditional red or a deeper burgundy, red nails can make a bold yet timeless statement, adding a touch of glamour to the mother of the bride’s appearance.
8. Pearl or Beaded Accents: Consider incorporating subtle pearl or beaded accents into the nail art. These additions can complement jewelry choices and add a touch of sophistication without being overly ornate.
9. Nude Ombré Nails: Nude ombré nails offer a modern and trendy twist to a classic nude manicure. The gradient effect creates visual interest and adds a contemporary flair to the mother of the bride’s nails.
10. Custom Nail Art: Collaborate with a nail artist to create custom designs that reflect the mother of the bride’s personality or incorporate meaningful symbols. This bespoke approach ensures a unique and personal touch to her nail art.
When selecting the best nails for the mother of the bride, it’s essential to consider her personal style, the formality of the event, and any thematic elements. Whether opting for a timeless French manicure or embracing more contemporary trends, the goal is to enhance her natural beauty and celebrate this momentous occasion with tasteful and memorable nail art.
Credit: robinmosesnailart.blogspot.com
What is a Good Nail Color for the Mother of the Bride?
Your wedding day is a special occasion for you and your mother. You want her to look and feel her best, so choosing the perfect nail color is important. Here are some guidelines to help you choose the best nail color for the mother of the bride:
Consider her skin tone: If your mom has fair skin, she’ll look best in light or nude colors. For medium or olive skin tones, go for mid-range shades like pink or mauve. If your mom has dark skin, deep hues like burgundy or plum will complement her complexion beautifully.
Think about the dress: What color is Mom’s dress? If it’s a light shade, she can get away with a bolder nail color. But if her dress is on the darker side, stick to a lighter hue to avoid looking overdone.
Take into account the season: Is your wedding taking place during summertime? If so, brighter shades like coral or lemon yellow would be lovely. Or if you’re getting hitched in winter, opt for jewel tones like emerald green or ruby red.
What Color Should I Paint My Nails for My Wedding?
Your wedding day is one of the most important days of your life, so you want everything to be perfect. That includes your nails! But with all of the different colors and styles out there, how do you choose what color to paint your nails for your wedding?
Here are a few things to consider when choosing a nail color for your big day:
1. The Color of Your Dress: One of the first things you’ll want to think about when choosing a nail color is the shade of your dress. If you’re wearing a white or ivory gown, classic shades like nude, pink, or light blue will complement your look perfectly. For a bolder look, go for red or burgundy nails. If you’re wearing a black dress, almost any color goes.
2. The Theme of Your Wedding: Is your wedding formal or laid-back? Romantic or rustic? The theme of your big day can help narrow down your nail color choices. For example, pastel hues like lavender or mint green would be beautiful for a springtime garden wedding. At the same time, jewel tones like emerald or sapphire would be stunning for an elegant ballroom affair.
3. Your Style: Of course, you’ll also want to choose a nail color that reflects your style. If you typically go for bright and bold shades, don’t be afraid to experiment on your wedding day. But if you usually stick to more subdued colors, that’s okay too – pick something in keeping with what makes you feel comfortable and confident.

How Do You Do Marbling on Nails?
Marbling your nails is a great way to add some pizzazz to your manicure. It’s a simple process that anyone can do at home with just a few supplies. Here’s everything you need to know about how to marble your nails.
Marbling on nails is a captivating and creative nail art technique that lends an intricate and unique pattern to your manicure. This mesmerizing design mimics the appearance of natural stone or marble, offering a chic and sophisticated look. Here’s a step-by-step guide on how to achieve beautiful marbling on your nails:
1. Gather Your Supplies:
To start, gather all the necessary supplies for marbling. You’ll need nail polish colors of your choice, a small cup of room temperature water, toothpicks or a thin nail art brush, tape or liquid latex to protect the skin around your nails, and a base coat and topcoat for a polished finish.
2. Prep Your Nails:
Begin by preparing your nails. Trim, shape, and buff them as desired. Apply a base coat to protect your natural nails and create a smooth surface for the nail polish.
3. Protect Your Skin:
To avoid a messy cleanup, protect the skin around your nails by applying tape or liquid latex. This will make it easier to remove any excess polish that gets on your skin during the marbling process.
4. Choose Your Colors:
Select the nail polish colors you want to use for the marbling. Traditional marbled designs often feature a combination of two or more complementary colors. Experiment with different color combinations to achieve the desired effect.
5. Drop Polish into Water:
Open the selected nail polish bottles and hold them close to the water’s surface. One by one, drop a small bead of each polish onto the water. The polishes should spread and create a concentric circle pattern on the water’s surface.
6. Create a Design:
Use a toothpick or a thin nail art brush to create a design on the surface of the water. Swirl the colors together to form unique patterns. You can create lines, swirls, or any design you prefer. Experiment with different techniques to achieve varied marbled effects.
7. Dip Your Nails:
Once you’re satisfied with the design, carefully position your nail over the pattern on the water’s surface. Slowly dip your nail into the water at a slight angle, allowing the polish to adhere to your nail. Use a toothpick to collect any excess polish on the water’s surface before removing your nail.
8. Clean Up Excess Polish:
After pulling your nail out of the water, remove the tape or liquid latex. Use a cotton swab or a brush dipped in nail polish remover to clean up any stray polish on your skin or cuticles.
9. Repeat for Each Nail:
Repeat the marbling process for each nail, refreshing the polish on the water’s surface as needed. Remember to protect the skin around your nails with tape or liquid latex before marbling each nail.
10. Apply Topcoat:
Allow the marbled design to dry completely before applying a clear topcoat. The topcoat seals and protects the marbled pattern, giving your nails a glossy and finished appearance.
11. Final Touches:
Once your nails are dry and the topcoat is set, marvel at your stunning marbled nail art. Admire the unique patterns on each nail and make any final touches if needed.
Marbling on nails is a versatile technique that allows for endless creative possibilities. Whether you opt for subtle pastels, bold neons, or classic monochromes, marbled nails are sure to make a striking statement. With a bit of practice and experimentation, you can master the art of marbling and enjoy the beauty of this captivating nail design.
Frequently Asked Questions (FAQs)
What nail art designs are suitable for a mother of the bride?
Nail art designs for the mother of the bride can range from classic French manicures to subtle accents like delicate florals or elegant lace patterns. Jewel-toned shades, neutral tones, and custom designs are also popular choices, offering versatility to match various styles and wedding themes.
Should the mother of the bride’s nail art match her outfit?
While it’s not necessary for the nail art to perfectly match the outfit, coordinating the colors or choosing complementary shades can enhance the overall look. Consider the color palette of the dress and accessories to create a harmonious and polished appearance.
How far in advance should the mother of the bride get her nails done?
The mother of the bride should schedule her nail appointment a day or two before the wedding. This timeframe ensures that the nail art is fresh and minimizes the risk of any last-minute mishaps.
Can the mother of the bride incorporate personal elements into her nail art?
Absolutely. Personalized elements such as initials, meaningful symbols, or custom designs can be incorporated into the nail art. Consult with a nail artist to discuss ideas that hold sentimental value and can be seamlessly integrated into the design.
Are there specific nail shapes that work well for the mother of the bride?
The choice of nail shape is subjective and depends on personal preference. However, classic shapes like oval or almond tend to convey a timeless and elegant look, suitable for formal occasions such as weddings. The mother of the bride can choose a shape that aligns with her style and comfort.
Conclusion
Choosing the perfect nail art design for the mother of the bride is a thoughtful and meaningful detail that adds a touch of elegance to her overall look on this special day. From classic French manicures to subtle accents, jewel-toned hues, and personalized touches, the options are diverse, allowing the mother of the bride to express her style and complement the wedding theme. These nail art designs contribute to the celebration’s ambiance, creating a harmonious connection with her attire. Whether opting for timeless sophistication or embracing contemporary trends, the goal is to enhance her natural beauty and celebrate her integral role with tasteful and memorable nail art. As the mother of the bride gracefully walks down the aisle, her beautifully adorned nails will undoubtedly be a subtle yet significant detail that adds to the joyous and unforgettable atmosphere of the wedding day.