Elevating your manicure game involves more than just polish – it’s about strategically placing unique designs on the ring finger to make a stylish statement. This focused attention on the ring finger adds a touch of flair and uniqueness to your overall nail aesthetic.
In this exploration of “Nail Art Designs for the Ring Finger,” we delve into the artistry and possibilities that come with making this specific digit stand out. From subtle accents to intricate patterns, the ring finger becomes a focal point for showcasing your style. Whether you’re aiming for elegance, playfulness, or sophistication, the ring finger opens up a realm of possibilities. Join us as we unravel creative ideas and techniques, turning your ring finger into a miniature work of art that captivates your attention and complements your individuality. Let’s embark on a journey where your nail art becomes an expression of creativity, with the ring finger playing a leading role in this delightful and stylish narrative.
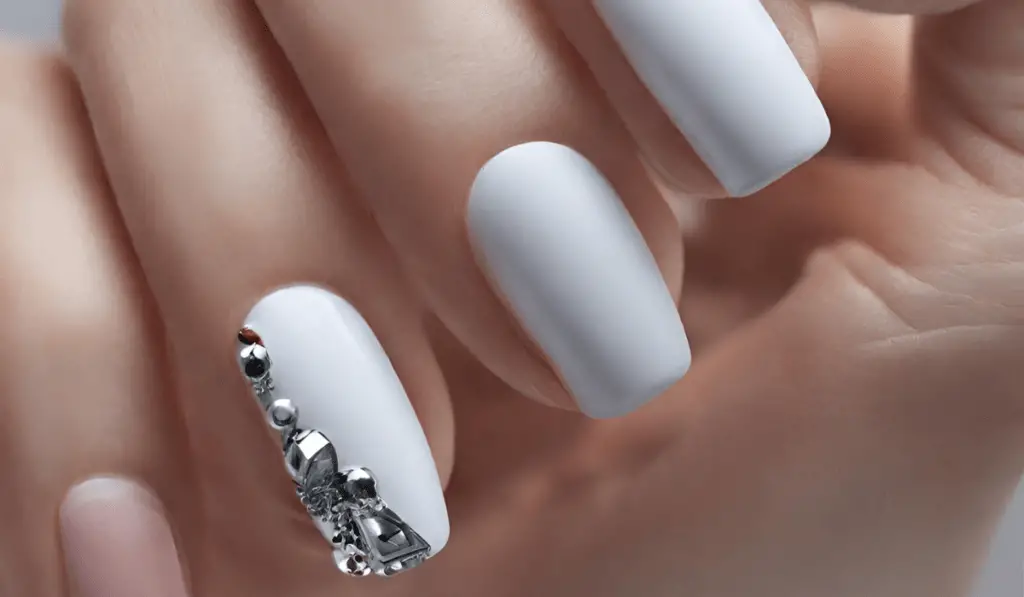
Dotted Nail Art Designs: Right Ring Finger
Ring Finger Nail Polish Trend Meaning
The latest nail trend sweeping Instagram is the ring finger nail polish trend. The idea is to paint your ring finger a different color than the rest of your nails. The most popular colors seem to be black and white, but you can really use any colors you want.
This trend is perfect for those who want to add a little bit of personality to their nails without going too crazy. There are many theories about the meaning behind this trend. Some say that it’s a way to show off your wedding ring if you’re married.
Others say that it’s a way to show off your engagement ring if you’re engaged. And still, others say that it’s just a fun way to mix things up and add some personality to your nails. Whatever the meaning behind it, one thing is for sure – this trend is here to stay.

Credit: www.belletag.com
How Do You Do Bts Nail Art?
If you’re a fan of the Korean boy band BTS, then you might want to try your hand at some BTS nail art. The seven-member group has become a global phenomenon, and its fans, known as the “Army,” are passionate about all things BTS. While you don’t need to be a professional nail artist to create some killer BTS nails, it helps to have some guidance.
So, we’ve put together a step-by-step guide on how to do BTS nail art at home. The first step is to gather your supplies. You’ll need some nail polish in the colors of the BTS logo (red, black, and white), a top coat, and some clear tape.
If you want to get really creative, you can also use gold or silver glitter polish and stickers or rhinestones. Once you have your supplies ready, start by painting your nails with a base coat of white polish. This will help the colors pop and make your design last longer.
Let the base coat dry completely before moving on to the next step. Next, use the tape to create stripes on your nails in the colors of the BTS logo. Start with two strips of red polish down the middle of each nail, followed by a strip of black on either side.
Once you’ve created all your stripes, go over them with another layer of red or black polish so that they’re nice and opaque. Carefully remove the tape while the polish is still wet, and seal everything with a top coat. For an extra touch of glamour, add some glitter or rhinestones around the edge of each stripe using topcoat as glue.
What Does Nail Polish on Ring Finger Mean?
Wearing nail polish on the ring finger carries symbolic significance in contemporary nail art culture. Often referred to as the “accent nail,” painting the ring finger with a distinct color or design is a stylish way to add a focal point to your manicure. Some people use the accent nail to showcase unique or intricate designs, while others opt for a contrasting color to make the ring finger stand out.
In certain contexts, a ring finger with distinctive nail polish may symbolize commitment or signify a special event, akin to the tradition of wearing a ring on that finger. Overall, it’s a creative and personalized way to draw attention to one specific nail, allowing for artistic expression and individual style within the realm of nail aesthetics.
What are the 5 Basic Nails Designs?
There are an endless amount of nail designs that you can do at home or at the salon, but there are five basic designs that serve as the foundation for most other designs. These five basic nail designs are:
1. The French Manicure: This classic design is perfect for any occasion. It is clean and elegant and relatively easy to do yourself. To achieve a French manicure, paint your nails with nude polish and then use white polish to create a horizontal line across the tip of each nail.
2. The American Manicure: This design is similar to the French manicure, but instead of using white polish on the tips of the nails, you will use a pale pink or beige shade. This look is perfect for those who want something a little more subtle than a French manicure.
3. The Reverse French Manicure: As the name suggests, this design is simply a French manicure done in reverse. Instead of painting your nails with nude polish and then creating a horizontal line across the tip with white polish, you will start with white polish and then paint over it with a nude shade. This gives your nails a bit more dimension and interest.
4. The Ombré Manicure: This trendy design has been all over Instagram lately. To achieve an ombré effect on your nails, start by painting them with a light base color (such as white or pale pink). Then, use slightly darker shades of polish (in graduated steps) to create an ombré effect from top to bottom on each nail. You can either blend these colors seamlessly or leave them slightly separated for more contrast – it’s up to you.
5. Glitter Gradient Nails: glitter gradient nails are simple yet stunning. To get this look, start by applying two coats of your favorite solid-colored nail polish. Once that’s dry, apply glue adhesive just above the half-moon area on each fingernail.
Next, sprinkle loose glitter onto each wet adhesive area. Finally, seal everything in place with another layer of clear topcoat.
How Do You Do Louis Vuitton Nails?
Achieving Louis Vuitton-inspired nails involves meticulous steps to capture the iconic luxury brand’s aesthetic. Begin by selecting a neutral or classic LV monogram base color, often beige or brown, mimicking the brand’s signature pattern. Using a fine-detail nail art brush or nail stickers, carefully recreate the iconic LV monogram on each nail. For added flair, incorporate gold accents, synonymous with Louis Vuitton’s opulence, by outlining the monogram or adding gold studs or foil.
Ensure precision in replicating the intricate details to capture the essence of the brand. Finish with a high-quality top coat for a glossy and long-lasting finish. While intricate, Louis Vuitton nails provide an opportunity to showcase your creativity and pay homage to the renowned fashion house. Experiment with variations and embellishments to personalize the design, creating a luxurious and stylish manicure that mirrors the sophistication of Louis Vuitton.
Longevity and Maintenance
Ensuring the longevity and vibrancy of your nail art requires thoughtful maintenance. Begin by applying a quality base coat before adding your chosen nail art design. This not only enhances adherence but also shields your natural nails from potential staining. Allow each layer, including intricate patterns or multiple colors, to thoroughly dry before applying the next. Seal your artistry with a durable top coat to provide a protective barrier against chips and scratches.
Be mindful of activities that may impact your nails, such as prolonged exposure to water or rough handling. Moisturizing your cuticles and nails regularly also contributes to overall health and appearance. Should any signs of wear or chipping appear, consider touch-ups to maintain the polished look. With proper care, your nail art can stay vibrant, allowing you to showcase your creativity and style for an extended period.
Frequently Asked Questions (FAQs)
Why focus on the ring finger for nail art designs?
Focusing on the ring finger adds a unique touch to your manicure, creating a stylish focal point that stands out and complements your overall nail aesthetic.
What types of designs work well for the ring finger?
Subtle accents like a different color, glitter, or intricate patterns such as floral motifs or geometric shapes often work well for the ring finger, allowing for creativity and variety.
Can I mix and match designs on different fingers?
Absolutely, Mixing designs across fingers adds visual interest. Just ensure a cohesive color palette or theme for a polished overall look.
How can I make my ring finger nail art last longer?
Apply a quality base coat, allow sufficient drying time between layers, and finish with a top coat for added protection. This helps maintain the longevity of your ring finger nail art.
Are there specific considerations for nail shapes when highlighting the ring finger?
Different nail shapes may impact how designs appear. Considerations for nail shape can include accentuating certain patterns or adapting designs to complement the overall shape of the nail.
Conclusion
Exploring nail art designs for the ring finger adds a delightful and personalized dimension to your manicure. This focused attention allows for creative expression and experimentation, turning a single digit into a stylish focal point. Whether you prefer subtle accents, intricate patterns, or bold statements, the ring finger becomes a canvas for showcasing your unique style. As you navigate the vast world of nail art, remember that the charm lies in the details, and the ring finger offers the perfect opportunity for those details to shine. Embrace the freedom to play with designs, colors, and textures, turning your ring finger into a mini-masterpiece that reflects your individuality. Let your creativity flourish, and may each manicure be a celebration of your distinctive taste and style, with the ring finger leading the way.