The trend of nail art designs is ever-changing, and one of the hottest trends right now is purple and gold. This color combination can be seen on the nails of celebrities and everyday women alike. Whether you are looking for a subtle design or something more over-the-top, there is a purple and gold nail art design out there for you.
Step into a world of opulent beauty with our exquisite collection of nail art designs in stunning shades of purple and gold. Embrace the allure of royalty as you adorn your nails with the richness of these regal hues. Our curated selection of purple and gold nail art is designed to captivate and elevate your style, whether you’re aiming for a touch of glamour or a statement of sophistication.
From intricate patterns to bold and contemporary designs, our collection caters to diverse tastes, allowing you to express your unique personality through your manicure. Whether you’re attending a special event, celebrating a milestone, or simply indulging in self-care, our purple and gold nail art designs promise to add a touch of luxury and elegance to your fingertips. Explore the fusion of colors, unleash your creativity, and let your nails become a canvas for a masterpiece that reflects your individuality. Elevate your nail game with the timeless beauty of purple and gold.
Black, Purple, And Gold Nail Art Design Idea
Step of Nail Art
Nail art is a captivating and creative way to express your style through your fingertips. Whether you’re a seasoned nail enthusiast or a beginner, mastering the basic steps of nail art will open up a world of possibilities. Here’s a step-by-step guide to help you achieve stunning nail art designs:
Step 1: Gather Your Supplies
Before you begin, gather all the necessary supplies. This includes nail polish in your chosen colors, a base coat, a top coat, nail art pens, brushes, dotting tools, and any additional embellishments you want to use. Having everything within reach will make the process smoother.
Step 2: Prepare Your Nails
Start with clean, trimmed nails. Remove any existing nail polish and shape your nails to your desired length and form. Push back your cuticles gently and, if needed, use a nail buffer to create a smooth surface.
Step 3: Apply a Base Coat
Apply a thin layer of base coat to protect your natural nails and help the nail polish adhere better. This step also prevents staining and promotes a longer-lasting manicure. Allow the base coat to dry completely before moving on to the next step.
Step 4: Choose Your Colors
Select the nail polish colors you want to use for your design. Consider the color scheme and the overall look you want to achieve. For example, if you’re going for a classic design, you might choose contrasting or complementary colors.
Step 5: Apply the Base Color
Apply your chosen base color to all your nails. Allow it to dry completely before proceeding to the next step. You may need to apply two coats for full opacity, but ensure each layer dries thoroughly.
Step 6: Plan Your Design
Before diving into nail art, plan your design. Whether you’re creating stripes, polka dots, or intricate patterns, having a rough idea will help you execute the design with precision. You can sketch it out or visualize it before starting.
Step 7: Nail Art Tools
Choose your nail art tools based on the design you’re aiming for. Nail art pens, brushes, and dotting tools are common instruments for creating various effects. Practice using these tools on a piece of paper or a practice nail to get comfortable with their application.
Step 8: Create Your Design
Now comes the fun part – creating your nail art. Use your chosen tools to apply different colors, shapes, and patterns. Take your time and work patiently, allowing each layer to dry before adding the next. Don’t be afraid to experiment and get creative.
Step 9: Add Details
If you want to take your design to the next level, consider adding details like glitter, rhinestones, or decals. These elements can add texture and dimension to your nail art, making it more visually appealing.
Step 10: Apply a Top Coat
Once your design is complete and has dried thoroughly, apply a top coat to seal in your artwork and add shine. This step also helps protect your design from chipping and extends the life of your manicure.
Step 11: Clean Up
Use a small brush or cotton swab dipped in nail polish remover to clean up any mistakes or excess polish around the edges of your nails. This step gives your manicure a polished and professional finish.
Step 12: Enjoy Your Masterpiece
Admire your beautiful nail art and enjoy the satisfaction of creating a unique and personalized manicure. Share your creation with friends or on social media to inspire others.
Remember, practice makes perfect, so don’t be discouraged if your first attempts aren’t flawless. Keep experimenting with different techniques and designs to find what works best for you. Nail art is a form of self-expression, so have fun and let your creativity shine.
Light Purple And Gold Nail Designs
Creating light purple and gold nail designs is a captivating venture that infuses elegance and sophistication into your manicure. To embark on this artistic journey, begin by gathering the essential supplies, including light purple and gold nail polish, a base coat, a top coat, and various nail art tools such as brushes or dotting tools. Prepare your canvas by ensuring your nails are clean, trimmed, and shaped to your liking. Push back your cuticles gently and use a nail buffer to create a smooth surface for optimal polish adherence.
Apply a thin layer of base coat to safeguard your natural nails and enhance the longevity of your chosen nail colors. As you delve into the color selection process, opt for a light purple shade that resonates with your desired aesthetic and a complementary gold hue for that touch of opulence. With your colors chosen, apply the light purple polish as the base color, allowing for the application of multiple coats if necessary, ensuring each layer dries completely before progressing.
For an added touch of flair, consider creating a gradient effect by applying the light purple polish to a makeup sponge and gently dabbing it onto the tips of your nails, seamlessly blending it with the base color. This gradient effect adds depth and visual interest to your overall design. Now, as you plan your design, envision the elements you wish to incorporate – whether it’s intricate patterns, stripes, or dots – to guide your application.
Select your nail art tools based on the planned design. Nail art brushes, dotting tools, or even toothpicks can be employed to create a variety of effects. Begin the creative process by applying the gold polish in your chosen design, be it diagonal stripes, geometric patterns, or gold accents on the tips. Embrace experimentation, and consider applying different patterns to each nail or maintaining uniformity for a cohesive look.
For those seeking an extra layer of detail, enhance your design with additional elements such as small rhinestones, glitter, or gold foil. These additions contribute texture and dimension to your manicure, elevating it to a level of exquisite sophistication. Once your design is complete and thoroughly dried, seal your artwork with a clear top coat. This final step not only adds a glossy finish but also ensures the longevity of your meticulously crafted design.
As you admire your stunning light purple and gold nail designs, consider sharing your masterpiece on social media or with friends, inspiring others to explore this elegant and timeless color combination. To maintain the longevity of your manicure, practice gentle nail care and avoid exposing your nails to harsh chemicals. Regularly applying cuticle oil keeps your nails and cuticles nourished, contributing to overall nail health.
Experiment with different patterns and designs to find what resonates with your style. Light purple and gold nail designs offer a versatile and timeless aesthetic, making them suitable for various occasions or everyday wear. Enjoy the creative process, and let your nails become a canvas for expressing your unique taste and style.

Credit: www.youtube.com
What are Some Popular Nail Art Designs That Use Purple And Gold Colors
If you’re looking for some chic and regal nail art designs, why not try out a purple and gold color scheme? Here are some popular ideas to get you started: 1. Royalty-Inspired Design: For a design that looks fit for a queen (or king), try a deep purple base with gold accents.
You can add in some sparkle with glitter or go for a more subdued look with matte polish. 2. Ombre Effect: Create an ombre effect by gradating from a light purple shade to a darker one, then adding gold tips or accent nails. This is a simple yet elegant design that’s perfect for any occasion.
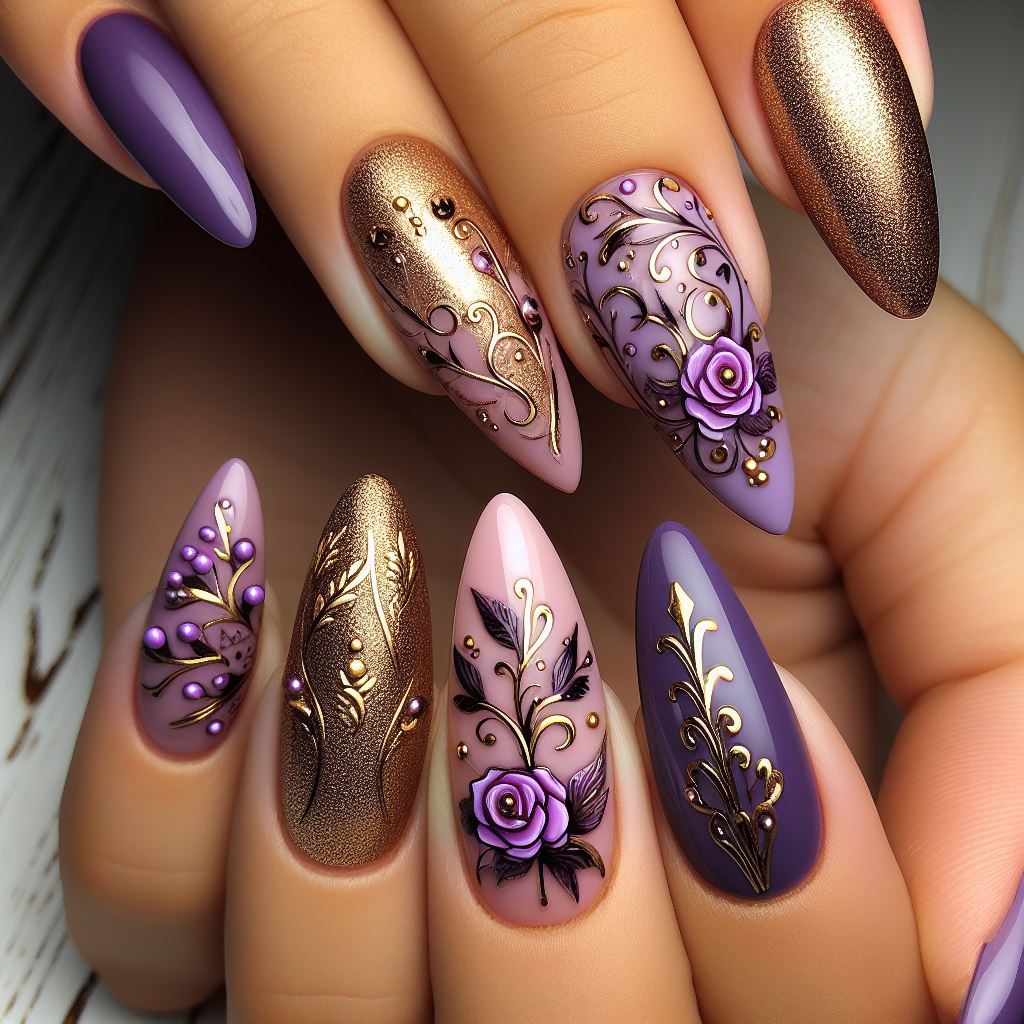
3. Floral Accents: Add some femininity to your nails with floral accents in shades of purple and gold. You can use real flowers (like lavender), dried flowers, or even paint on some delicate blooms. 4. Glitz & Glamour: If you want your nails to really stand out, go all out with glittery purple polish and shimmery gold details.
How Can You Create Your Own Unique Purple And Gold Nail Art Design
If you’re looking to add a touch of royalty to your nails, then look no further than this guide on how to create your own unique purple and gold nail art design. Whether you want something simple and understated or bold and flashy, we’ve got you covered with everything you need to know. To start off, you’ll need to gather your supplies.
For this design, you’ll need a base coat of clear polish, purple polish, gold polish, top coat of clear polish, and some tape (optional). Once you have all of your supplies ready to go, start by painting your nails with a base coat of clear polish. This will help protect your nails from the darker colors that we’ll be using later on.
Next, take your purple polish and paint all of your nails except for your ring fingers. On your ring fingers, paint just the tips with purple Polish, leaving a small space at the base unpainted. Once the purple has dried completely, it’s time to move on to the gold.
Paint all of your nails in gold except for your index fingers. On your index fingers, paint just the tips in gold, leaving a small space at the base unpainted as well. At this point, you can either leave things as is or add some embellishments like stripes or dots using tape or a toothpick before sealing everything in with a top coat of clear polish.
What are Some Tips for Creating Perfect Purple And Gold Nail Art Designs
When it comes to creating purple and gold nail art designs, there are a few tips that can help you achieve the perfect look. First, when choosing your colors, make sure to use a light purple shade for the base color and a darker gold shade for the accent nails. This will help create depth and dimension in your design.
Additionally, be sure to use a top coat on your finished design to protect it from chipping and fading. Finally, if you want to add some extra sparkle to your nails, consider using glitter polish or rhinestones. With these tips in mind, you’ll be able to create stunning purple and gold nail art designs that are sure to impress.
Frequently Asked Questions (FAQs)
What makes purple and gold a popular combination for nail art designs?
Purple and gold create a striking and regal contrast, evoking a sense of luxury and sophistication. This combination is versatile, allowing for a wide range of creative designs suitable for various occasions.
Can I use different shades of purple in a single nail art design with gold?
Absolutely. Mixing light and dark shades of purple within the same design adds depth and complexity. Combining various purple tones with gold accents can result in a visually captivating and harmonious manicure.
Are there specific nail art techniques that work well with purple and gold colors?
Yes, several techniques complement purple and gold nail art. Ombre effects, gradient designs, and intricate patterns using nail art tools like brushes and dotting tools are popular choices. Experimenting with these techniques can yield stunning results.
How can I prevent my purple and gold nail art from chipping quickly?
To enhance the longevity of your nail art, apply a quality top coat. This protective layer not only adds shine but also helps prevent chipping and fading. Be sure to seal the edges of your nails to provide extra durability.
Can I incorporate additional elements like glitter or rhinestones into purple and gold nail designs?
Absolutely. Glitter, rhinestones, and other embellishments can elevate your purple and gold nail art. Consider adding a touch of sparkle to accent nails or creating intricate designs using these elements for a more glamorous and customized look.
Conclusion
Exploring nail art designs in the enchanting combination of purple and gold opens the door to a world of elegance and creativity. The regal allure of this color duo allows for endless possibilities, from sophisticated patterns to bold and glamorous statements. Whether you opt for a classic royalty-inspired design, a subtle ombre effect, or intricate floral accents, the synergy of purple and gold brings a touch of opulence to your fingertips. Embrace various techniques, experiment with shades, and let your nails become a canvas for self-expression. With the right tools and a dash of imagination, you can effortlessly elevate your manicure to a realm of sophistication. Purple and gold nail art not only enhances your style but also adds a luxurious and captivating touch to your overall look. Let your nails shine with the timeless beauty of this royal color combination.