Nail art is a creative way to express your personality and style. It’s also a great way to add some fun and flair to your everyday look. If you’re new to nail art, or just looking for some inspiration, here are some great ideas for creating your own designs at home.
One of the most important things you’ll need for nail art is a good quality top coat. This will help protect your nails from chipping and peeling, and will also make your designs last longer. You can find top coats at most beauty supply stores, or online.
Another essential item is a base coat. This will help even out the color of your nails so that your design pops. Again, you can find base coats at most beauty supply stores, or online.
Once you have your top and base coats, it’s time to start thinking about what design you want to create. Do you want something simple, like polka dots or stripes? Or something more elaborate, like flowers or animals?
The sky’s the limit when it comes to nail art, so get creative!
If you’re looking to get creative with your nails at home, there are a few things you’ll need to create beautiful nail art. First, you’ll need a base coat of polish to protect your nails and help the color adhere. Next, choose the colors you want to use for your design.
You can either use one solid color or mix and match different shades. Once you’ve decided on your colors, it’s time to start painting! Use a thin brush or toothpick to create simple designs like stripes or dots.
If you’re feeling ambitious, try painting flowers or other more intricate patterns. Finally, seal your design with a top coat of polish and enjoy your fabulous new nail art!
10 Nail Art Designs Using HOUSEHOLD ITEMS! | The Ultimate Guide #5
What Can I Use for Nail Art?
There are a variety of options available for those looking to get creative with their nails. Nail art can be done at home with a few simple supplies, or you can go to a salon and have it done professionally.
One of the most popular ways to decorate nails is with polish.
You can use a solid color, or get creative with stripes, polka dots, or other designs. You can also buy pre-made stickers and decals to apply to your nails.
What Do I Need to Do Nail Art at Home?
If you want to do your own nail art at home, there are a few supplies you’ll need to get started. First, you’ll need a good base coat and top coat to protect your nails and help the polish last longer. You’ll also need some nice nail polishes in various colors – try to get a mix of both light and dark shades, as well as some glittery or shimmery polishes for added fun.
Finally, you’ll need a couple different types of brushes or dotting tools – these will help you create all sorts of designs on your nails.
Once you have all your supplies gathered up, it’s time to start painting! Begin by applying a base coat to all your nails, then let that dry completely.
Next, start with one color and paint your nails as desired – solid color, stripes, dots, whatever you like! Once that color is dry, feel free to add more colors or designs on top. When you’re finished creating your masterpiece, seal it all in with a top coat and admire your work!
What Can I Use If I Don’T Have Nail Art Tools?
If you don’t have nail art tools, there are still plenty of ways to decorate your nails! Here are a few ideas:
1. Use a toothpick or bobby pin to create small dots or lines.
This is a great way to create simple designs like polka dots or stripes.
2. Use a cotton swab dipped in polish remover to create a marbled effect. Simply swirl the cotton swab around on your nail until you’re happy with the design.
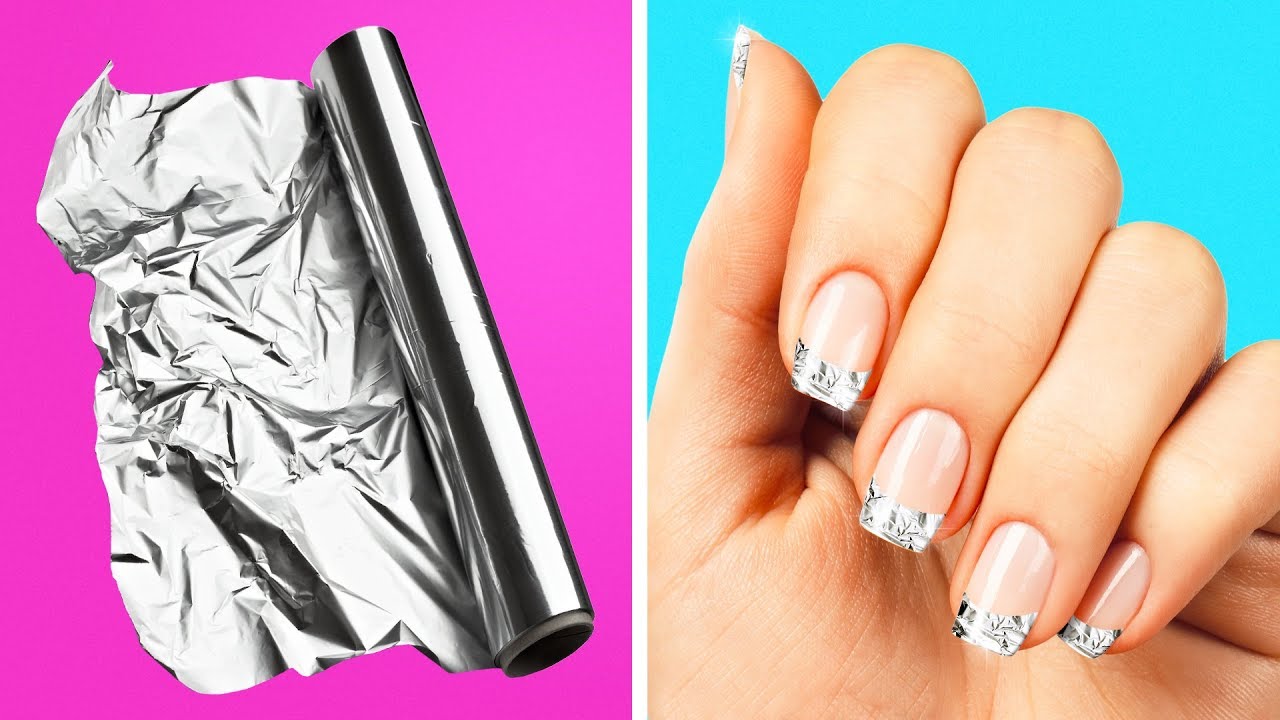
3. Get creative with household items! Try using a piece of Scotch tape to create geometric shapes or use a dotting tool made from the end of a pen or pencil.
With a little creativity, you can still achieve beautiful nail art without any fancy tools!
Credit: www.youtube.com
Easy Nail Art Designs at Home for Beginners Without Tools
Do you love getting your nails done but hate the hassle (and cost) of going to the salon? Have no fear! You can create beautiful nail art designs at home without any fancy tools.
All you need is a little polish and some patience.
One of the simplest and most popular nail art designs is the French manicure. To create this look, start by painting your nails with a pale pink or nude polish.
Once the base coat is dry, apply strips of tape or stickers along the tips of your nails. Paint over the tips with a white polish, then remove the tape or stickers. Finish off with a clear topcoat and voila!
You’ve got yourself a chic French manicure.
If stripes are more your style, try this easy design. Start with two coats of your favorite solid-colored polish.
Once that’s dry, use a second color to paint thin stripes across your nails using a striping brush or toothpick. Finish things off with a clear topcoat and admire your handiwork!
For something a little more fun and playful, try polka dots!
Begin by painting your nails with one color as usual. Once that’s dry, take another color and dot it onto your nails using either a dotting tool or the back end of a bobby pin. Create as many (or as few) dots as you like, then finish things off with yet another coat of clear polish.
These are just three simple examples – there are endless possibilities when it comes to easy nail art designs at home! So get creative, have fun & save yourself a trip (and some money) by doing your own manis & pedis from now on.
Conclusion
Nail art is a creative way to decorate your nails. It can be simple or elaborate, and there are many different ways to do it. You can use polish, stickers, gems, and other decorations to create unique designs.
If you’re not sure how to get started, there are plenty of tutorials and videos online that can help you learn.
There’s no need to go to a salon to get beautiful nail art. You can create stunning designs at home with the right supplies.
All you need is some patience and creativity! Start by painting your nails with a base coat of polish. Then, choose the colors and decorations you want to use.
Use a thin brush or toothpick to apply them carefully. Finish with a top coat of clear polish for extra protection.
With a little practice, you’ll be able to create any design you can imagine!